Introduction
I'm a newbie who joined the company less than a year ago, but one day I had to use React for work. When I looked into it, I found a lot of articles... I ended up using React, which is a major tool in the web industry. In fact, I only had a superficial knowledge of JavaScript and jQuery, so I was far from mastering them (sigh).
So, despite my limited experience, I decided to try to understand it in my own way and summarize it in this article.
What is React?
What is React?
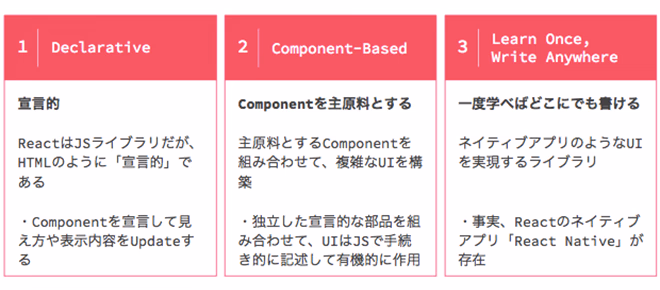
React is a JavaScript library that allows you to create and arrange components, and is the technology that is used by Facebook and Instagram. Instagram, which is a hot topic these days?! I was a little surprised and my interest was piqued.
Features of React
So what are the specific features of React? Let's take a look at the following.
yes.
It looks like it uses components in a JavaScript library that doesn't look like JavaScript.
I could tell it was useful.
But I still don't really understand...
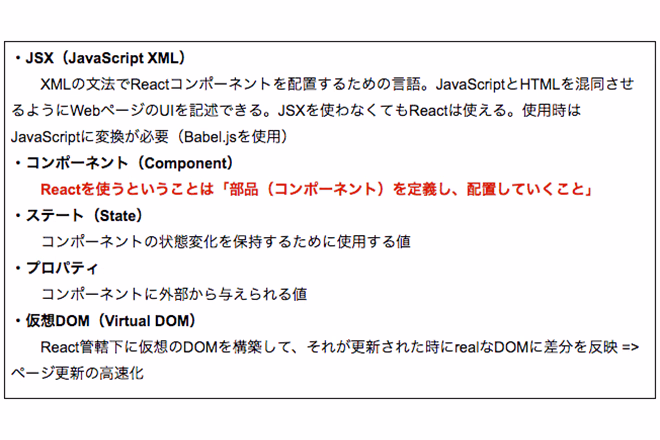
Five Keywords to Understand React
What exactly does React use? Let's look at the people involved.
yes….
It seems useful, but there are a lot of unfamiliar keywords, so it doesn't seem that easy.
At times like these, I always say the magic words:
"It's easier to give birth than to worry about it."
It seems that React creates and arranges things called components.
Try using it for now and understand each part as you go.
What is JSX (JavaScript XML)?
JSX is a language extension that makes it easy to write JavaScript in an HTML-like format.
You can use React without using JSX, but using JSX makes React more convenient to use.
Specifically, you will be able to create components by writing React code in an HTML-like format, allowing you to code intuitively while imagining the HTML that will appear after loading.
Before we get to React
ES6 (ES2015)
Refers to the version of ECMAScript that is based on rules for standardizing JavaScript.
Convenient functions have been added, making writing easier and clearer.
It can be said that ECMAScript has undergone a revolutionary evolution with ES6 (released in June 2015).
There's no choice but to use ES6!!
However, it cannot be used with browsers such as IE11, Opera Mini, and Samsung Internet!! (As of July 13, 2018)
So...we use Babel.
What is Babel?
A Node.js transpiler (compiler) that converts the features added in ES6 to ES5.
If you convert ES6 to ES5 you don't need to worry about the browser.
How to use Babel
Just add the following line to your code!
*This is a service called CDN (Content Delivery Network, a distribution network), but since it is not the topic of this article, we will not go into detail here.
Using React ~Let's create a component~
In order to help you understand React smoothly, let's make the environment as simple and lean as possible this time!
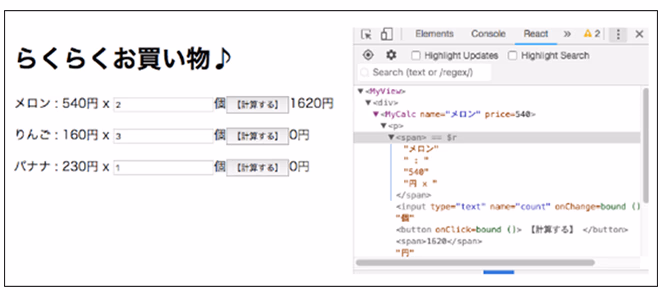
So, this time we will create a screen that calculates the cost of items purchased when shopping.
★Completed image
1. Prepare HTML
The folder structure for creating React this time is as follows.
First, let's look at the HTML.
index.html
Let's start by looking at the <head> tag. The necessary items are loaded as shown below.
Loading React
<script crossorigin src="https://unpkg.com/react-dom@16/umd/react-dom.development.js"></script>
Loading Babel
As mentioned above, this is all you need to start using React and Babel.
Next, let's look inside the <body> tag.
Define where the HTML for the React component you're about to create will be output.
Give a div tag an arbitrary id and prepare it as the place to display the React you created.
Loading the JavaScript file "calculator.js" that describes the React component MyCalc that we will create, and outputting the component
In #1 we are loading the JavaScript that will define the component.
In #2 to #5, the component defined in #1 is used to render (draw) the HTML.
#3 is the React method that actually renders it into HTML.
In #4, we pass the parameters "Melon" as the name and "540" as the price to the MyCalc component that we will actually create later.
In #5, we specify that the data should be output to the part of the HTML with the ID “area_calc”.
Regarding #1 and #2, one thing to note is that you should write “type="text/babel"”.
If you don't write this, the React code you create in ES6 will not be converted (transpiled) to JavaScript.
It's hard to understand what this means right now, so keep reading even if you don't understand. I'll explain it later.
2. Writing JavaScript
Next, let's look at JavaScript.
calculator.js
1. Defining components
Now, it's time to finally create a component!
Definition of React component “MyCalc”
This is a description of a React component called MyCalc that renders (draws) to HTML.
Let's take a look inside the MyCalc component one by one!
The render() method for rendering
In #6, the return value is the processing (content) that the MyCalc component will actually execute when rendering to HTML.
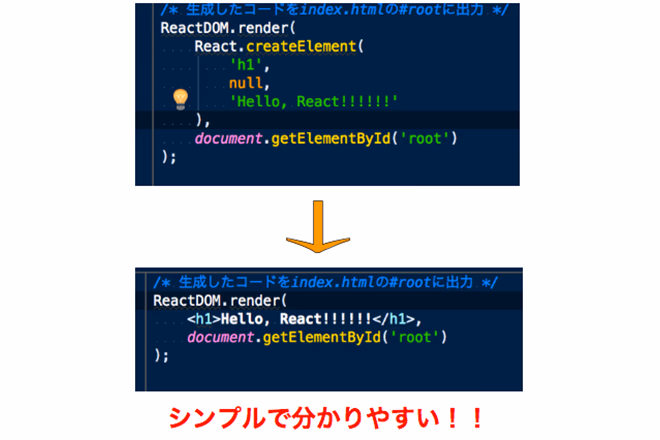
#7 to #11 are similar to those in the past. This is JSX. It looks like HTML.
There are no unfamiliar tags (actually, they are not tags but Virtual DOMs).
Regarding #7, this will be rendered verbatim into the HTML as a <p> tag.
#8 is output as a <span> tag just like #7, but it contains the unfamiliar “this.props.name” and “this.props.price”.
Ok, let's go back to #4 in index.html and take a look!
this is,
It will be.
This is the "Properties".
This is the "value given to a component from the outside" that we introduced in "Five keywords for understanding React."
Now we can express values like "melon" or "540" inside a <span> tag.
Regarding #9, there are general types and names for <input> tags. This is self-explanatory.
However, there is also an unfamiliar "onChange={this.setQuantity}" here.
This will call the setQuantity() method defined in your own component every time you make a change to the input tag, such as entering or deleting a number.
As for #10, it is a <button> tag and contains the unfamiliar “onClick={this.calcMultiple}”.
As with #10, when you click on a part in the HTML rendered with <button>, the calcMutiple() method defined in your own component is called.
We will explain the setQuantity() and calcMultiple() methods in #9 and #10 later.
Regarding #11, I understand that it is a <span> tag, but again, the unfamiliar “{this.state.item_amount}” appears.
It looks like it's displaying a value you've defined somewhere.
If you look closely, you can see the word "state."
This is the "state".
This is the "value used to store changes in the component's state" that we introduced in "Five keywords for understanding React".
Because this is where the calculation results are output and where they are instantly and dynamically rewritten by React, we need to use states instead of properties.
How can we use states?
Let's take a look at the constructor() method of the MyCalc component.
First of all, state is a value used to store the changing state of a component, but it cannot be changed directly from outside the component.
Now let's see how to rewrite it.
For a state to be a value that can be rewritten, it must first have some value.
As you can see from the image of the finished product "What we will make this time" mentioned above, if no information is entered, "0" is displayed.
In other words, it is necessary to make sure that "0" is displayed unconditionally when the screen is displayed.
Regarding #12, this will be the first constructor() method that is executed when this component is called.
#13 is for making the property available for use.
Regarding #14, this is where the state is defined. And since it is in the constructor() method, it means initialization.
In #14, “item_quantity” and “item_amount” are initialized to “0” respectively.
Up to this point, we have completed the procedures that will allow us to use the state for now.
However, the question remains: "How do we rewrite the state?"
Let's try to remember.
In #9 and #10, we said that "We will explain the setQuantity() method and calcMultiple() method later."
In fact, the state is rewritten in #9 and #10!
So let's take a quick look at each one.
Let's first look at the setQuantity() method.
This was called with "onChange={this.setQuantity}"!
In other words, every time you enter a number, an event is passed to the setQuantity() method, and the value entered from the received event is set to the item_quantity that was initialized earlier in your component.
This is the rewriting of the state.
Next, let's look at the calcMultiple() method.
This was called with "onClick={this.calcMultiple}".
Like setCount, the calcMultiple() method is called each time you click, and the price received in the property is multiplied by the current value of the state “item_quantity”, and the result is set to the item_amount initialized earlier in the component.
This also rewrites the state.
Let’s summarize what we’ve done so far.
In the MyCalc component, values such as "Melon" and "540" received from the HTML ReactDOM.render() method are defined as properties, and initial values for the input and output fields are defined as states. These values are then used to create an HTML-like (JSX) DOM structure.
However, this is not HTML but "Virtual DOM".
React converts this Virtual DOM into actual HTML and outputs it to the screen.
By calling the setQuantity() or calcMultiple() methods and rewriting the state by entering data into the input field or pressing a button, the content displayed on the screen will change without any screen transitions.
In this case, React is fast because it does not recreate the DOM from scratch, but only modifies the changes in the Virtual DOM and reflects them in the DOM!!
However, this alone doesn't actually work.
Did you notice? I haven't mentioned #15 or #16.
In fact, unless you bind each method beforehand in the constructor() method as in #15 and #16, each method will not work.
this.calcMultiple = this.calcMultiple.bind(this);
This can surprisingly be a stumbling block, so be careful!
3. Writing JavaScript in HTML (output to HTML)
Let's take another look at the HTML output.
Output to HTML using the React component you created
In #1, we load the JavaScript that defines the component.
In #4, call the MyCalc component by passing the parameters "Melon" to the name and "540" to the price of the MyCalc component you created.
In #5, specify that you want to output the data to the HTML with the ID "area_calc".
#3 actually renders it into HTML.
4. Duplicating components
Finally, let's talk about component cloning.
JavaScript code in index.html
Regarding #4 above, by simply changing the values of the MyCalc component you created in the same parameter format as above, you can create multiple modules with the same appearance and behavior!
It was a little difficult to make, but once you have it done it's a breeze!
Some of you may be wondering, "Isn't the <div> in #17 unnecessary in terms of markup?"
However, React has a rule that when returning rendering content, there must be only one top-level DOM structure.
Therefore, if you want to return multiple parallel elements, you need to wrap the outside in a <div> tag or similar.
Now, our React component is complete!
There will be no unnecessary screen transitions.
★Completed image
For something as lightweight as this one, the power of React cannot be fully utilized, so there will be no difference if you do not use React.
However, it will become even more powerful when dealing with more complex modules and large amounts of data!
bonus
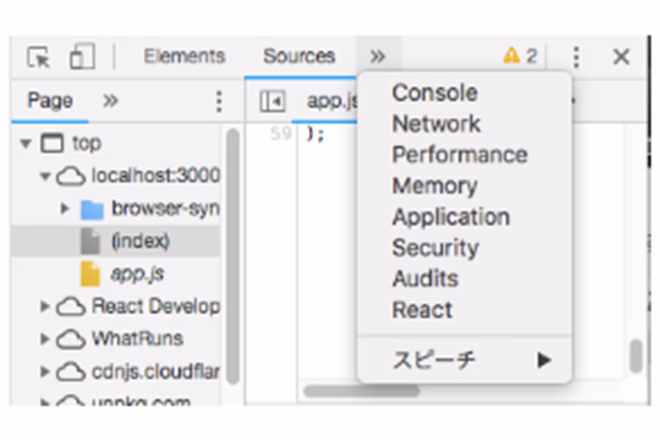
"React Developer Tools"
https://chrome.google.com/webstore/detail/react-developer-tools/fmkadmapgofadopljbjfkapdkoienihi
A Google Chrome add-on. Recommended for those who want to see how components are used on the screen rendered by React!

モノサスアーカイブ