こんにちは、WS部(Webマスターサポート部)の垳田です。
私たちWS部では、様々なクライアントのWebサイト運用を日々させていただいています。以前の記事で、サイト運用におけるコーディングについて、制作方法から公開作業までの注意点などをご紹介しましたが、今回は「応用編」として書いてみたいと思います。
公開後にサイトを運用していくなかで、ページを更新する際にスムーズに対応できるコーディングやバナーエリアの更新など、ちょっとしたポイントを3つの点からご紹介したいと思います。
1. マークアップの書き方
リンクボタン箇所<a>タグを削除しても大丈夫なコーディング方法
サイト運用においては、今後想定されるケースを踏まえて対応することが大事です。
例えば、リンク設定でよくあるのがこんなケースです。
- 今はリンクになっている箇所だが、今後遷移先の商品が売切れた場合には、商品ページに遷移させたくないので、リンクを削除したい
このような場合、HTML の <a> タグを削除するだけでコーディングできるなら簡単ですが、<a> タグを取ることで、そのエリアが崩れてしまうようであれば、再度そのエリアの HTML と CSS を更新してコーディングをやり直さないといけなくなってしまいます。
コーディングをする上で、クラス名を付与する手間などを考えると<a>タグのセレクタに直接CSSを掛けてしまうケースもあるかと思います。
そこで、サイト制作者が考慮しておくべきポイントは、以下の2つです。
・<a> タグのセレクタにCSSを付与しない
【HTML】
<p class="btn"><a href="#">詳細はこちら</a></p>
【CSS】
.btn a {
	display: block;
	width: 100%;
	margin: 0 auto;
	text-decoration: none;
	background: #F80307;
	color: #fff;
}
・<a> タグの親要素のセレクタにCSSを付与する
【HTML】
<div class="button-area">
<p class="btn"><a href="#">詳細はこちら</a></p>
</div>
【CSS】
 .button-area {}
	.button-area .btn {
		display: block;
		width: 100%;
		margin: 0 auto;
		text-decoration: none;
		background: #F80307;
		color: #fff;
	}
-

-
ポイント!
その他にも、
・<a> タグセレクタにかけずに、<a>タグのクラス名を付与しておくのがオススメです。
→HTML側で <a> タグを <p> タグに変更し、同じクラス名を付与すればリンク遷移がなくなる【HTML】
<p class="btn"><a href="#" class="btn-link">詳細はこちら</a></p>
【CSS】
						.btn {}
							.btn .btn-link {
								display: block;
								width: 100%;
								margin: 0 auto;
								text-decoration: none;
								background: #F80307;
								color: #fff;
							}
上記のように対応しておくと、コーディングに関する知識があまりないWebマスター(運用担当者)でもクラス名やHTMLのタグが分からない場合でも迷わずに更新することができます。
2. ランディングページにおけるコーディング
画像をベタ貼りすると、後々運用しにくい
ECサイトなどにおいて、LP(ランディングページ)の更新作業をする場合によく見られるのが、画像を大きくスライスして、大きなセクション要素としてコーディングされているページです。
※イメージ例)青枠内のセクションを全体を一枚画像としてスライス
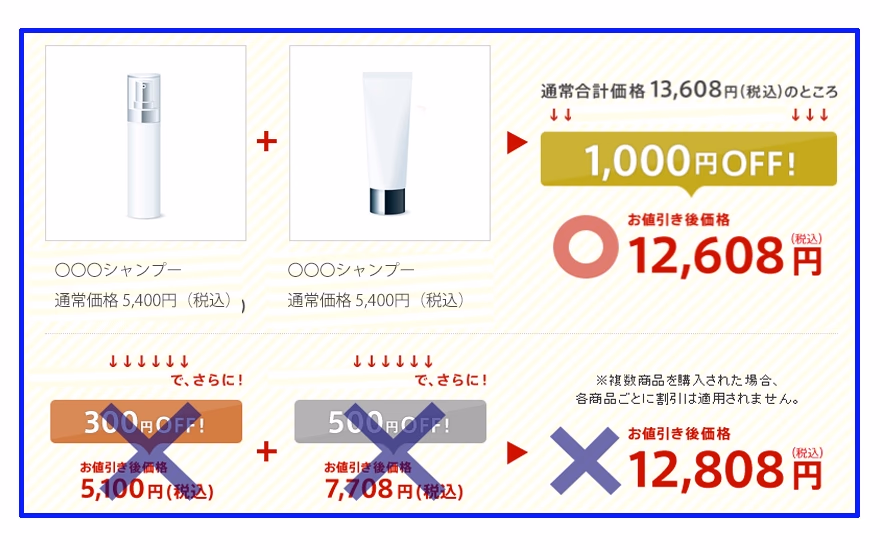
確かに、最初にコーディングする際には、短時間で簡単に対応できますが、LPの場合でも、掲載期間中にページを更新することは多々あると思います。
例えば、LPで紹介した商品が売り切れた場合に、デバイスフォントとして、その商品画像付近にテキストを入れたいという依頼があったとします。ここで、その商品部分全体が画像として置かれていると、そのエリアをコーディングし直すか、PSD上で画像変更などを対応しなくてはいけなくなります。
こういう状況を考慮し、ページ内で変更が想定される部分は、極力、細分化した画像でコーディングしておくことが重要です。全てを画像として表現できないといった場合でも、なるべく対応しておくことで、後々簡単にページを更新することができます。
※イメージ例)青枠内のパーツごとにてスライス

-
-
ポイント!
画像を細分化して組むことは、SEO対策的にもページの読み込み速度的にも良いです。
細分化することで、コーディング工数は掛かってしまいますが、コンテンツ内容を把握し、更新が発生するだろう箇所を想定し、その箇所だけでも、細分化してコーディングしておくことをおすすめします!
3. バナー差替え
すぐに差替え対応できるように
ECサイトなどでは、トップページにバナーが多数掲載されていることがよくあります。運用において、バナーエリアの更新は大事な作業です。新商品が発売されたとき、その新商品が売り切れた時、他の商品を売りに出したいとき、また、常にデフォルトで設置できるバナーに戻したいときなど、毎回、そのエリアを見直すというは非常に手間であり、面倒になってしまいます。
このような場合を想定して、デフォルトで表示するバナーについては、常にHTML上でコメントアウトさせて、非表示状態にしておくと、誰でも容易にページ更新ができて便利です。
この方法は、サイトの構築方法によっては、ソース上に不要なソースが残ってしまいソースが解析しにくくなってしまったり、コメントアウトしたソースが、運用していくなかで時系列に残ってしまうことを考えると、ベストな方法と言えないかもしれませんが、一つの方法として考えておくと良いかと思います。
-
-
ポイント!
コメントアウトを使うことは通常の制作ではあまり無いかもしれませんが、運用においてては臨機応変に使用することで工数の削減につながります。
また、複数人で1つの案件を担当している場合も、コメントアウトしておくことでスムーズに情報を共有して確実に対応することができます。
サイトの運用においては、誰でも容易に更新作業できるように、サイトを構築することが重要です。サイト構築する時には、様々なことを考慮して設計・構築していくと思いますが、充分に実践できていないケースもあります。
特に、運用においては複数の会社が携わることもあるので、今回ご紹介した方法をそのまま取り入れられないこともありますが、後々の運用をしやすくするという視点から、参考にしていただけると幸いです。

モノサスアーカイブ
モノサスを離れたメンバーたちが、過去に書いた記事をご紹介しています。