
こんにちは。
コーディングファクトリー部 コーダーの丸山です。
このコーナーでは、コーディングファクトリーの仕事のスタイルや、深堀りしたコーディング技術をメインにお伝えしていきたいと思っています。また、コーダーが各々のコーディング論を語る座談会なども企画してますのでお楽しみに!
今回は私がこの要素を知ってから(コーディングの)世界観が変わった!というCSSの要素の一つである『::before,::after擬似要素』の特徴とコーディング例をご紹介します。
::before,::after擬似要素とは
擬似要素(pseudo elements)は、W3Cによると"文書言語(HTML)に記された以上の抽象概念や情報を与えるもの"とされています。::before,::after擬似要素は、指定された要素の前後にある生成要素(generated content)を示します。
簡単に言うと、::before,::after擬似要素を用いると指定要素(divタグなど)の前後にテキストやアイコンを挿入することができるセレクタです。
擬似クラスとの違い
擬似クラス(pseudo classes)は、特定の事象や状態を持つ要素に対してスタイルを適用できるセレクタです。
例えば、li要素の最初の子要素(li:first-child)やリンクをマウスオーバーしたとき(a:hover)などです。
擬似クラスと擬似要素を同じようなものとして解説してあるWebページなどもありますが、基本的には擬似クラスと擬似要素は別のものとして考えていた方が良いと思います。
また、擬似クラスで1つ面白いことがあります。
要素内の最初の子要素を表す:first-child擬似クラスと最後の子要素を表す:last-child擬似クラスは似ていますが、:first-child擬似クラスはCSS2でサポートされていますが、:last-child擬似クラスはCSS3で新たにサポートされています。
そのため、CSS3を適用できるIE9以上でないと:last-child擬似クラスが使えないのです。
擬似要素のコロンは1つ(シングルコロン)なのか2つ(ダブルコロン)なのかという問題
CSS2までは擬似クラスも擬似要素もシングルコロンでしたが、CSS3からダブルコロンでの記述に変更になりました。
ただし、IE8ではCSS3がサポートされていないため、ダブルコロン記述はできません。
そのため、現状ではスマホサイト または IE9以上のブラウザが対象のPC/RWDサイトの実装にのみダブルコロン(E::before,E::after)を用いて、IE8以下も対象に入るときはシングルコロン(E:before,E:after)で記述しましょう。
::before,::after擬似要素を用いたコーディング例
例①:テキストアイコンとリンクアイコンが付いたボタンのようなリスト
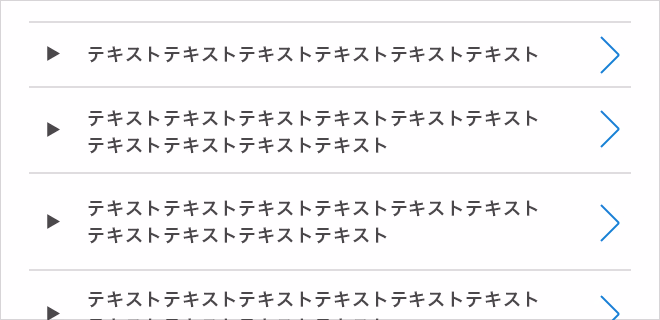
例①のような見た目の要素をコーディングする場合、
HTMLは下記のようになります。
<ul class="list-links">
  <li><a>テキストテキストテキストテキストテキストテキスト</a></li>
  <li><a>テキストテキストテキストテキストテキストテキストテキストテキストテキストテキストテキストテキスト</a></li>
  (・・・省略)
</ul>
今回はli要素の::beforeに対して四角いアイコンのスタイル指定、
a要素の::afterに対して右向き矢印アイコンの指定をしていきます。
基本的に::beforeには要素の前側(左または上)、::afterには要素の後ろ側(右または下)を指定しておくと複数人でコーディングを行う際も認識のズレが起こりにくいでしょう。
CSSは下記のように記述します。
.list-links {
  width: 100%;
}

.list-links > li {
  position: relative;
  border-bottom: 1px solid #ddd;
}
.list-links > li:first-child { border-top: 1px solid #ddd;}

.list-links > li::before {
  position: absolute;
  content: "";
  top: 50%;
  left: 10px;
  width: 10px;
  height: 10px;
  margin-top: -5px;
  background: url("/common/images/ico_arrow_black_01.png") top left no-repeat;
  background-size: 10px 10px;
}
.list-links > li a {
  display: block;
  position: relative;
  padding: 15px 30px 15px 30px; /* 左右にアイコン分を考慮した余白を指定 */
  font-weight: bold;
}

.list-links > li a::after {
  position: absolute;
  content: "";
  top: 50%;
  right: 10px;
  width: 12px;
  height: 24px;
  margin-top: -12px;
  background: url("/common/images/ico_arow_links_blue_01.png") top left no-repeat;
  background-size: 12px 24px;
}
今回の場合のCSSでのアイコン実装のポイントは、
位置をtop: 50%;にして、画像の半分のサイズのネガティヴマージンを付与することです。
なぜ、ネガティヴマージンを付与するかというと、top: 50%;では画像の上辺が要素の高さの半分の位置に来てしまい見た目の位置が半分よりもアイコンサイズ分下になってしまうためです。
そのため、アイコンサイズの半分の高さのネガティヴマージンを付与して上に押し上げて上下中央表示にしています。
例②:吹き出し
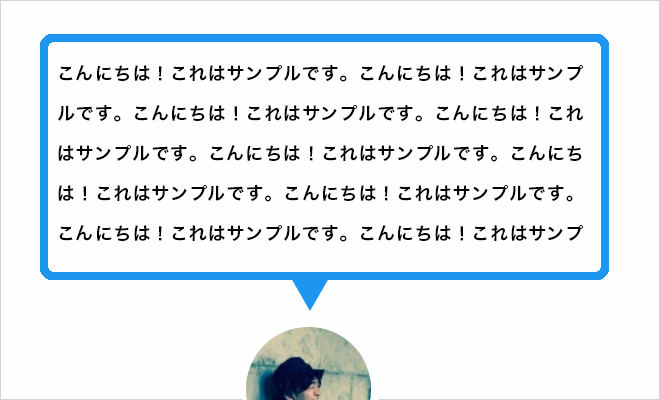
例①と同様のやり方で、例②も::afterを使ってコーディングしてみましょう。
吹き出しを構成するdiv要素の::afterに吹き出しの三角形の画像を配置します。
HTMLは下記のように記述します。
<div class="box-balloon">
  <p>こんにちは!これはサンプルです。こんにちは!これはサンプルです。こんにちは!これはサンプルです。こんにちは!これはサンプルです。こんにちは!これはサンプルです。(・・・省略)</p>
</div>
CSSは下記のように記述します。
.box-balloon {
  position: relative;
  width: 100%;
  max-width: 480px;
  padding: 15px;
  border: 6px solid #279ee9;
  border-radius: 6px;
  margin-bottom: 42px; /* 三角形画像の高さ + 下に取りたい余白の大きさ */
}
.box-balloon::after {
  position: absolute;
  content: "";
  left: 50%;
  bottom: -32px;
  width: 34px;
  height: 32px;
  margin-left: -17px; /* 三角形画像の幅の半分 */
  background: url("/common/images/ico_baloon_tip_01.png") top left no-repeat;
  background-size: 34px 32px;
}
.box-balloon > p {
  font-weight: bold;
  line-height: 2.0;
}
例②の場合は、位置をtopでなくleft: 50%;で指定し、吹き出しの三角形画像の幅の半分のネガティヴマージンを付与して左に寄せて左右中央表示にしています。
今回は::before,::after擬似要素に画像を配置するパターンのみをご紹介しましたが、 これらの擬似要素を使った表現のパターンは他にもあります。
githubやcodepenなどのソースコードの共有をしているサイトを覗いてみると新しい発見があるかもしれません。
また、擬似要素を使うメリットは装飾をCSSで出来るだけでなく、見た目を再現するためだけの空divなどHTMLの文章構造上は不要なタグを無くし、綺麗で見やすいHTMLを保つことができるというマークアップ的な利点もあります。
::before,::after擬似要素を積極的に活用してより良いコーディングライフを!!

丸山 智之
大分県の田舎町からWebに憧れて上京してから十数年...、ベテランと呼ばれる領域に入りかけていますがまだまだ日々勉強中です。 風貌にもベテラン感が出てきてしまったのでダイエットとアンチエンジングを頑張りたいです。